Posts

Showing posts from 2011

Advent Calendar Wall Hanging

Image
This is not a tutorial by any means. . . more of a hooray! I got this project done!  Lois and I saw one of these Advent Calendar wall hangings at the Quilt Shop in Colby.  So, of course, we had to buy some panels.  We decided to make four of them--one for Lois and one for each of her children's families.  We started work on them in in October.  I took a panel with me to the Quilt Shop to pick out binding materials.  We used a different binding material for each one.  A week or so later, I got out the backing and the panels to get things ready to take them to be quilted.  I only had three!  Of course, I panicked.  I called the Quilt Shop to see if they had any more panels, and they were sold out.  I found a place online and ordered another panel.  In the meantime, I got into some of the fabric I had bought for the binding. . . guess what I found?  The panel that I had taken along to match fabrics to!  To make a long story longer, we ended up making five of these.  We gave the fifth

Flower Hair Bow

Image
If you are looking for a fun way to use up fabric scraps, this is it.  Lyla even left it in for about 20 minutes (a record for her with a clip.)  Here is a link to how to make it:  Flower Hair Bow .  I love the Prudent Baby site.  I have found lots of cool stuff to do there.  The flower requires a small amount of hand sewing and a hot glue gun, which is my kind of project!  The blog said that it made a large flower, but mine turned out about 2 inches big when finished.  I think next time I may start with a larger circle--maybe 4 inches instead of two as per the blog instructions--to make the flower bigger.  I thought this one turned out really cute, though.

Abby's Boots

Image
Made these little boots for my niece's baby shower today.  You use two coordinating fabrics that have been quilted together.  I got the material from the Quilt Cabin in Colby.   Doris Mote did the quilting.  I thought they turned out really cute.  They were actually not too difficult.  Here is a link to Curby's Closet to get the pattern:  "Too Cute to Kick Off" Boots .  I made the flowers from felt.  I found an easy tutorial.  Here is the link:  Easy Felt Flowers.   They were so simple to make and looked great.  The tutorial recommended using coins to make a pattern for the flower.  I used dimes to make a small flower.  Maddie and I made a larger flower for her using quarters for the template.  We are going to make it into a hair clip for her.  I have definitely found another fun thing to make!

Peanut Butter Brownies

Image
So I was trying to think of something to make for church potluck tomorrow, something that I had the ingredients for and something that my son, Evan, could help me with.  My husband Matthew teases me that I always make brownies for such occasions.  My sister-in-law Stephanie teases me that I can't just make a plain brownie.  Well, I plead guilty on both counts!  Evan and I concocted these peanut butter brownies, and I think they are going to be good. To make, start with any brownie mix for a 9 by 13 inch pan size.  Make the "cake-like" brownie recipe (add three eggs instead of two).  After your batter is mixed, add 1 1/2 cups peanut butter chips before placing in pan and baking according to package directions.  We frosted them with peanut butter frosting--I'll include the recipe below.  That seemed a little too plain, so I melted 1/4 cup chocolate chips with 1/2 teaspoon shortening in the microwave and drizzled it over the top.  I'm hoping that the ch

"Manpron," an Apron for a Boy!

Image
As I was completing aprons for my girls, I had the idea that I could make an apron for Evan.  I ran the idea by Matt, and he thought it was a good idea.  He thought, though, that we needed a different name for the item than "apron." So, here is my project--a manpron for my little guy.  Start by obtaining some measurements--length from chest to knee (or however long you want it to be), width at chest level, width a few inches above waist (where the apron will tie) and length from chest to where the apron will tie.  For my above-average height five year old, chest was 7 inches, waist 20 inches, length 22 inches, and about 8 inches for the chest to waist measurement.  I actually forgot the last measurement and ended up "winging it." This was not wise, because I had to take the apron apart at the end and take an inch off the top.  So, don't forget to get all of your measurements first! For simplicity, I added an inch to each measurement to allow for seam allo

Aunt Joyce's Pie Crust

Image
Pies, pies, pies!  I dabbled in pie-making in the past, and, frankly, decided it wasn't for me.  The pie dough recipes that required cutting butter into the flour, etc. fascinated me, but I never had much luck with them.  My pie dough would turn out too tough or just plain wasn't right. So I had resigned myself to not being a pie maker.  My Great Aunt Joyce always made the most beautiful pies, so one day I got her recipe.  What a difference!  The dough is so easy to make and so easy to work with.  And, it turns out great every time.  I guess I am a pie maker! Aunt Joyce's Pie Crust (makes 1 two-crust pie) 3 cups flour dash salt, optional 1 cup canola oil (only use canola!) 1/2 cup water Heat oil and water in pan on stove top until it just comes to a boil.  Remove from heat and let sit 15 minutes.  Meanwhile, place flour and salt (if desired) in large bowl.  After 15 minutes, pour oil and water into flour and mix with a fork until dough comes together.  Ro

Apron Making

Image
I get so excited when I finish a project.  I finally got the buttons sewed onto Anna's apron yesterday.  When I found the flip flop buttons at Walmart, I was pretty excited that they would match the fabric I had already picked out.  Hopefully I can wait until Christmas to give it to her!  I got started on Maddie's yesterday as well and will post pictures when I finish it.  I love this apron, and the pattern is fairly easy (although I still end up having to redo things because I don't always read as carefuly as I should!).  You can find the pattern here: Kids Four Corner Apron ,  All this sewing for my girls has made me think that my boy should get something for Christmas that I have sewn.  So, I have in mind an idea for a "manly" apron for him.  I found some really cute dinosaur fabric to use.  I'll post it, also, when I'm through.  For now, it feels good to cross another project off my list and put Anna's apron in my gift bin! Okay, so I was al

Quick Church Night Supper

Image
The kids have AWANA on Wednesday nights.  They have to be there by 5:55, so that means I need to make supper early.  I should be starting supper by 4:30 at the minimum, but sometimes that doesn't happen.  Last night was one of those times.  What were we going to eat?  Then I had an idea taken from a recipe my mother-in-law makes.  I simply started a box of wild rice on the stove.  In the meantime, I thawed about two cups of broccoli in the microwave and a half-pound of cooked ground beef that I had frozen previously.  When the rice was finished, I threw in the broccoli, ground beef, about three quarters of a cup of cheese and heated it through.  With some grapes on the side, I had a fast, one-pot meal.  Lois, my mother-in-law, does this with roast beef and peas.  Her roast beef has some onion seasoning on it which lends the dish some wonderful flavor.  As it was, my dish was a little bland.  We added some soy sauce, and it was a hit with the kids.   I'm thinking that u

Appliqued Hoodie Towel

Image
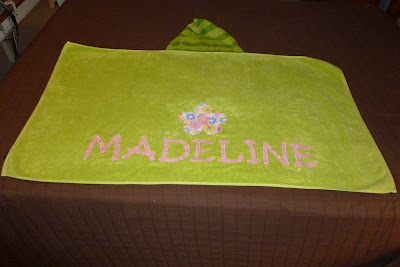
Looking for a fun Christmas or birthday gift for a child?  Then try appliqued hoodie towels!  Anna, my three year old, always wants to use her little sister's hooded towels after bath time.  However, the hoods on those are made of washcloths and did not get her hair dried very well.  So I found a site that used a hand towel to make the hood.  After I had made one, I had my seven year old try it out.  It was plenty big for her, so I dedided to make one for each of my kiddos for Christmas this year.  To see how to assemble the towel, check out this link: Hooded bath towel.   You will need two bath towels and one hand towel to make two hooded towels. I found these towels at Target. I used a solid color towel for the bath towel portion and a striped hand towel for the hood. Cut your hand towel in half. Center the hand towel on the bath towel with the raw edge upwards.  You will be looking at the right side of each towel.  I ended up putting the edge of the hand towel