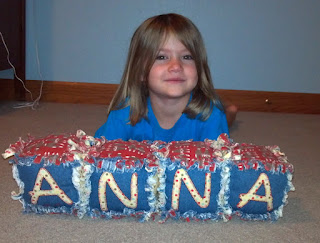
Appliqued Rag Blocks
I made these blocks for my daughter, Anna, a couple of years ago. It was before I started this blog, so I didn't take pictures as I went along. However, I think I can explain their construction well enough to be able to share this fun idea with you.
I got the notion from another site that featured fleece blocks. I thought it would be neat to do the same thing with flannel and denim and then rag the edges.
Here's what you will need for each 4 inch block:
6 six inch squares of coordinating fabric. I used two denim, two yellow polka dot flannel, and 2 red monkey flannel squares.
Additional fabric for the applique.
Wonder under to apply the applique.
Stabilizer to place under fabric you are going to applique.
To make, print 3 inch letters, numbers, or whatever you want to applique on the blocks on cardstock. I put A N N A on one side of the blocks, and 1 2 3 4 on the other. Apply wonder under to fabric according to the instructions. Trace your applique backwards on the paper and cut out. Remove paper and apply to your square. Applique in place using your preferred stitch. I used a decorative applique stitch. You could use a zig-zag or simply a straight stitch slightly inside the edge of the fabric.
Assemble the blocks. See this tutorial for instructions on assembling the blocks. You will sew them together using a 1 inch seam allowance. The seams will be on the outside of the block. Sew all seams, leaving a small hole on one side to stuff. Stuff the block, then push the stuffing over to the side and use your machine to sew the hole up.
At this point, snip the seam allowance about every 1/4 inch, being careful not to cut the seam.
Wash on gentle in your machine and dry. You will want to clean out the lint trap often. I washed and dried the blocks 2 times to get the desired amount of fray on the edges.
You will probably want to do this project for kiddos with shorter names or else use their initials. I opted to use "ANNA" insted of "ANNABELLE" for my little girl. I wasn't sure I could get 9 of these puppies made while my child was still young enough to play with them.
Hope you enjoy this fun project!


Comments
Post a Comment